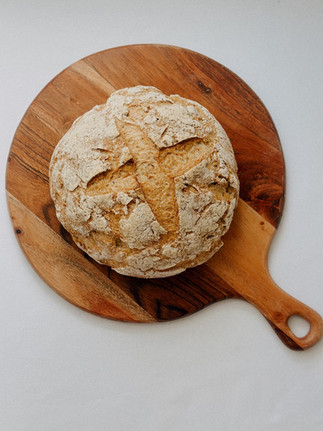
Easy Gluten Free Sourdough Bread
- Leah Drumheller
- Oct 30, 2023
- 4 min read
Updated: Dec 19, 2025
If you’ve ever wanted a gluten‑free sourdough bread recipe that actually tastes like real homemade bread, you’re in the right place! When sourdough started trending on Tiktok (yes, I am a proud member of sourdoughtok,), I remember thinking how badly I wanted to try it! I started with a brown rice flour starter and well...it went not so great. Gluten free sourdough bread is intimidating -- messy dough, long proofing times, and lots of trial and error -- but this step‑by‑step gluten‑free sourdough loaf has become my go‑to when I want a crusty artisan‑style bread straight from my oven. With psyllium husk for structure and a long, cool proof to develop flavor, this loaf is tender inside with a crisp crust and the kind of texture that makes homemade bread so worth the effort. Whether you’re baking your first gluten‑free sourdough or refining your technique, this easy, reliable recipe delivers every time.
Still need to create a gluten free sourdough starter? Check out my recipe here!

Ingredients:
2 cups King Arthur Gluten Free Measure for Measure Flour
1 tsp Salt
1 ½ cups Water, room temperature
2 tbsp Honey (or Maple Syrup)
1 tbsp Olive Oil
3 tbsp Psyllium Husk, whole
1 cup Sourdough Starter
White Rice Flour (optional)
Instructions:
Before you are ready to start making your gluten free sourdough loaf, you will need to feed your gluten free sourdough starter with ½ cup of gluten free flour and ½ a cup of water. Do this 6 to 12 hours before.
In a large glass bowl, whisk together the flour and salt.
In a separate bowl, combine the water, honey, olive oil, and psyllium husk. Let it sit for a few minutes or until it begins to thicken
Once the psyllium husk mixture has thickened, mix in the sourdough starter.
Add your wet ingredients to your dry ingredients and mix with a dough whisk until roughly combined. Cover with plastic wrap or a towel and set aside for 30 minutes in a warm place.
Knead the dough until you can form it into a smooth round bowl. Dust a clean bowl or banneton basket with white rice flour, place the dough seam side up, cover, and let proof on the counter for another 2 hours.
The next step is the long proof phase. I have found that the best method for proofing a gluten free loaf is a long proof in the fridge. Place the loaf in the fridge for 8 to 12 hours.
Once the long proof is over, it is time to shape your dough:
Flatten the dough into a rectangle, being careful not to cause any tears or holes.
Fold the dough into thirds, creating a trifold, and then roll into a ball. Knead gently to close the seams and shape the loaf.
Rest for 15-20 minutes and repeat.
The last step before baking is one more shorter proof. Place the dough seam side up in the bowl/basket and cover with the rest of the towel. Let it proof on the counter for 2 hours.
30 minutes or so before the final proof is over, preheat your oven to 500F with your dutch oven inside of it.
Once the oven has preheated, lay a piece of parchment paper down on the counter and place the dough seam-side down. Score the dough in any design you would like using a bread lame or a knife. Then, carefully place the dough into your dutch oven.
Drop your oven temperature to 450F and bake the loaf with the lid on the dutch oven for 45 minutes.
Remove the lid and bake uncovered for 20 minutes.
When the loaf is done baking, immediately remove from the dutch oven and place on a cooling rack. As tempting as it may be, do not cut into your loaf! You need to let it cool for a few hours before you slice into it, otherwise it will be gummy.
Frequently Asked Questions:
My loaf is flat. What do I do?
This can be due to a variety of reasons. Maybe your starter isn't mature enough or there was something off with your proofing times. This recipe is here to provide a guideline, but you'll need to learn what works best for your starter. We all live at different altitudes, in climates with different humidity and temperatures, etc. For example, my loafs need a longer, warmer proof in the winter than they do during the summer.
Why is my loaf purple or gray?
If your loaf turns out a funny color, you probably used Psyllium Husk Powder instead of whole.
What time of day do you start your sourdough loaf?
Making gluten free sourdough bread is time & labor intensive! Add in the cooling time and it is close to a 24 hour process. I like to start my loaf at 7 or 8 in the morning so that I can bake it before I go to bed. This allows it to cool completely overnight, making it perfect to eat in the morning.
What tools do you use?
You can find all the tools I use to make my gluten free sourdough bread on my amazon storefront under Sourdough Starter Kit. Full disclosure, I can earn commissions off of anything purchased from this kit, but I promise that I would not link anything if it wasn't what I was already using!


This recipe has been updated as of October 2024 based off of feedback and further recipe development!
Recommended Sourdough Bread Tools
If you’re looking to build (or upgrade!) your sourdough baking kit, I’ve put together my favorite tools and essentials in my Amazon Storefront — including the perfect stuff for getting your starter bubbling and your loaves rising.
Check out my sourdough starter kit here: Gluten Free Sourdough Starter Kit
Affiliate Disclaimer: Some of the links above are affiliate links. That means if you click through and make a purchase, I may earn a small commission at no extra cost to you. Your support helps me keep this blog going and bring you more recipes and tips — thank